Perl/Tk
■ Perl/Tkでウィンドウアプリケーションを作成する
◆ Perl/Tk とは
Tk(ティーケー)は Tck(ティックル)という言語用に開発されたウィンドウアプリケーション用のプログラミングインタフェースです。Tck/Tk として広く使用されていますが、この Tk 部分を Perl から利用可能にしたものが Perl/Tk です。
◆ Perl/Tkのサンプル
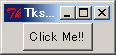
下記のような簡単なプログラミングで GUI 部品を表示することができます。
use Tk;
# トップウィンドウを作る
$top = MainWindow->new();
$top->optionAdd( '*font' => 'MSゴシック 10' );
# ボタンを作成する
$button = $top->Button(
-text => "Click Me!!", # ボタンに表示される文字
-command => \&onButton # 押下時に実行するサブルーチン
);
$button->pack(); # ボタンを配置する
# メインループに突入
MainLoop();
# ボタンが押されたときに呼ばれる
sub onButton {
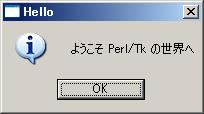
# メッセージボックスを表示
$top->messageBox(
-type => "ok",
-icon => "info",
-title => "Hello",
-message => "ようこそ Perl/Tk の世界へ"
);
}
■ Perl/Tkでいろいろな部品を用いる
◆ 各種部品を作る
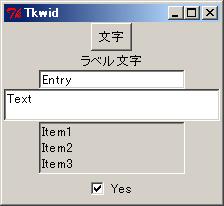
Perl/Tk では、ボタンや入力フィールドなど、様々な部品を用いることができます。これらの部品のことを ウィジェット と呼びます。詳細は、perldoc Tk::Button などでそれぞれのヘルプを参照してください。
use Tk;
$top = MainWindow->new();
$top->optionAdd( '*font' => 'MSゴシック 10' );

# ボタン
$button = $top->Button(-text => "文字", -command => \&onButton)->pack();

# ラベル
$label = $top->Label(-text => "ラベル文字")->pack();

# テキスト入力フィールド
$entry = $top->Entry()->pack();

# テキスト入力エリア
$text = $top->Text(-width => 30, -height => 2)->pack();

# リストボックス
$listbox = $top->Listbox(-height => 3)->pack();
$listbox->insert(0, "Item1", "Item2", "Item3");

# チェックボタン
$checkbutton = $top->Checkbutton(-text => "Yes")->pack();

MainLoop();
■ 部品の位置を制御する
◆ 部品の位置を制御する
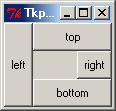
pack() の引数で部品の配置を指定することができます。-side => "bottom" は、スペースを上下に2分割してその下側に部品を配置することを、-fill => "y" は縦方向にいっぱい、部品を広げることを意味します。例では、ウィンドウを左右に2分割してその左側に left ボタン、残りのスペースを上下に 2分割してその上側に top ボタン、残りのスペースを再度上下に 2分割してその下側に bottom ボタン、残りのスペースを左右に 2分割してその右側に right ボタンを表示しています。
use Tk;
$top = MainWindow->new();
$top->Button(-text => "left")->pack(-side => "left", -fill => "y");
$top->Button(-text => "top")->pack(-side => "top", -fill => "x");
$top->Button(-text => "bottom")->pack(-side => "bottom", -fill => "x");
$top->Button(-text => "right")->pack(-side => "right", -fill => "x");
MainLoop();
◆ フレームを用いる
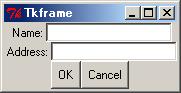
フレームを用いることで、もう少し複雑なレイアウトを実現することができます。下記の例ではウィンドウ内に 3つのフレームを作成し、そのフレームの中を左右に区切って部品を配置しています。
use Tk;
$top = MainWindow->new();
$f1 = $top->Frame()->pack();
$f2 = $top->Frame()->pack();
$f3 = $top->Frame()->pack();
$f1->Label(-text => "Name:")->pack(-side => "left");
$f1->Entry()->pack();
$f2->Label(-text => "Address:")->pack(-side => "left");
$f2->Entry()->pack();
$f3->Button(-text => "OK")->pack(-side => "left");
$f3->Button(-text => "Cancel")->pack();
MainLoop();
■ Perl/Tkでメニューを作成する
◆ メニューを作成する
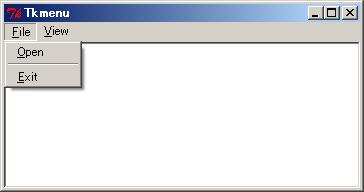
下記のようにして、メニューバーを実装することができます。それぞれのメニューに対応するサブルーチン onExit() や onOpen() などを実装していけば、簡単なテキストエディタを作成することもできます。
use Tk;

# トップウィンドウを作る
$top = MainWindow->new();
$top->optionAdd( '*font' => 'MSゴシック 10' );

# メニューバーを作る
$menu = $top->Menu(-type => "menubar");
$top->configure(-menu => $menu, -width => 300, -height => 100);

# [File]メニューを作る
$menu1 = $menu->cascade(-label => 'File', -under => 0, -tearoff => 0);
$menu1->command(-label => 'Open', -under => 0, -command => \&onOpen );
$menu1->separator;
$menu1->command(-label => 'Exit', -under => 0, -command => \&onExit);

# [View]メニューを作る
$menu2 = $menu->cascade(-label => 'View', -under => 0, -tearoff => 0);

# テキスト入力フィールドを作る
$text = $top->Text(-width => 50, -height => 10)->pack();

# ウィンドウを表示する
MainLoop();
■ ラベル文字を動的に変更する
◆ ラベル文字を動的に変更する
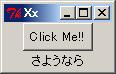
ラベル文字列の代わりにラベルの中身を示す変数へのリファレンスを与えておき、この変数の内容を変更することにより、ラベルの中身を動的に変更することができるようになります。
use Tk;

# メインウィンドウを作成する
$top = MainWindow->new();
$top->optionAdd("*font" => "MSゴシック 10");

# ボタンを配置する
$button = $top->Button(-text => "Click Me!!", -command => \&onButton);
$button->pack();

# ラベルを配置する
$labelText = "こんにちは";
$label = $top->Label(-textvariable => \$labelText);
$label->pack();

# メインループに突入
MainLoop();

# ボタンが押されたときに呼ばれる
sub onButton {
    # メッセージボックスを表示
    $labelText = "さようなら";
}

■ Perl/Tkを用いた簡易電卓
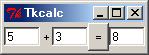
◆ 簡易電卓
Perl/Tk を用いた実用サンプルとして、簡易電卓を紹介します。
use Tk;

# メインウィンドウを作成する
$top = MainWindow->new();

# 一つ目の入力項目(X)
$wX = $top->Entry(-textvariable => \$x, -width => 5);
$wX->pack(-side => "left");

# プラス記号
$plus = $top->Label(-text => "+");
$plus->pack(-side => "left");

# 二つ目の入力項目(Y)
$wY = $top->Entry(-textvariable => \$y, -width => 5);
$wY->pack(-side => "left");

# =ボタン
$equal = $top->Button(-text => "=", -command => \&onButton);
$equal->pack(-side => "left");

# 答えを表示する領域
$wAns = $top->Entry(-textvariable => \$ans, -width => 5);
$wAns->pack(-side => "left");

# メインループ
MainLoop();

# ボタンが押されたら答えを計算する
sub onButton {
    $ans = $x + $y;
}